

So! I hear you want to make some Christmas Crafts but you need some inspiration? Queue Sabrina with a whole host of ideas! Yay! I will be starting with simple ones and moving on and up from there, because I'm not sure how many of you keep crafting things at home. Hopefully, I will cover something for everyone to make, and you'll be able to enjoy creating at least one of these delightful Christmas themed items with your baby or children.
Tag Your Baby Club on social media if you make some so that we can see them too! #SabrinasChristmasCrafts
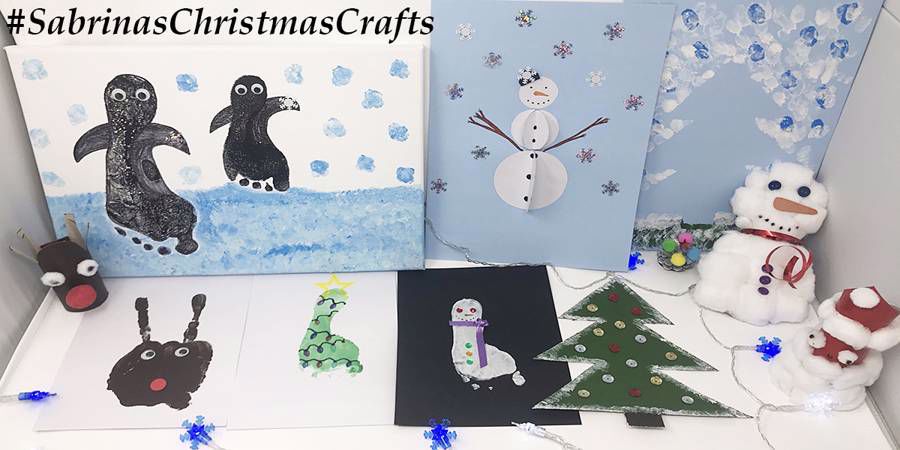
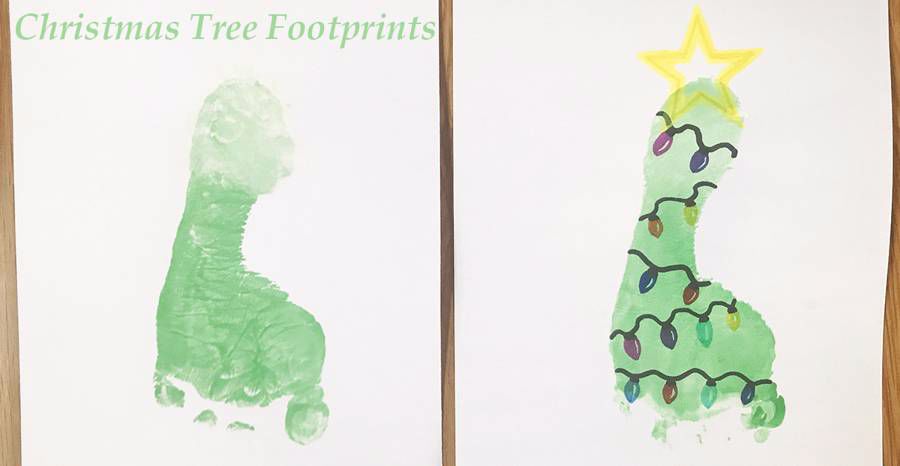
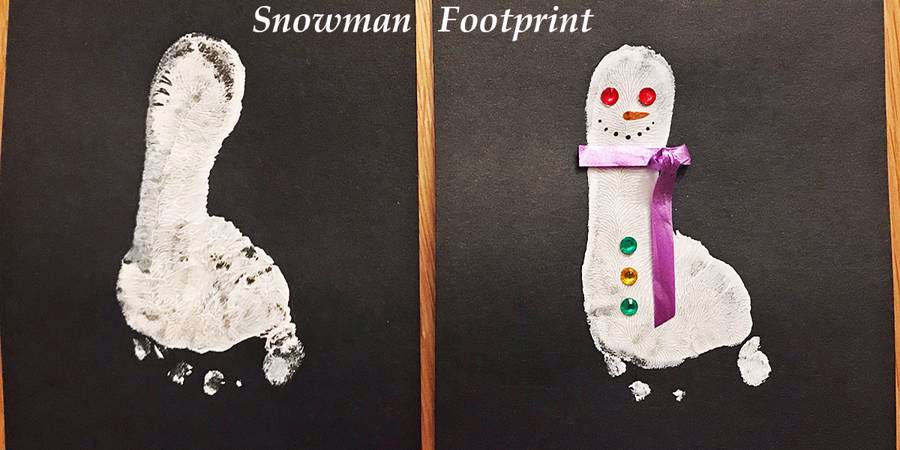
Card Crafts - Foot Prints
A real easy one is Foot Print cards! You can turn Foot Prints into a Christmas Tree, Snowman, Penguin, Reindeer and more! Double it up by overlapping two heels and make babies first Christmas with "Mistle-Toes" even!
These easy crafts just require some child-friendly paint, some card and a paintbrush. Get your little ones clean barefoot and some card. Paint all over and make sure there is enough on the skin to create the print. Press your little one's foot on to the card and gently peel off straight up to avoid any smudging. Once the print is dry you can decorate it and make it into whatever you like. I love the Christmas Tree idea or a Snowman. Reindeer is the easiest of them all; just draw antlers and some facial features like a nose and eyes! Here are mine to give you some inspiration.
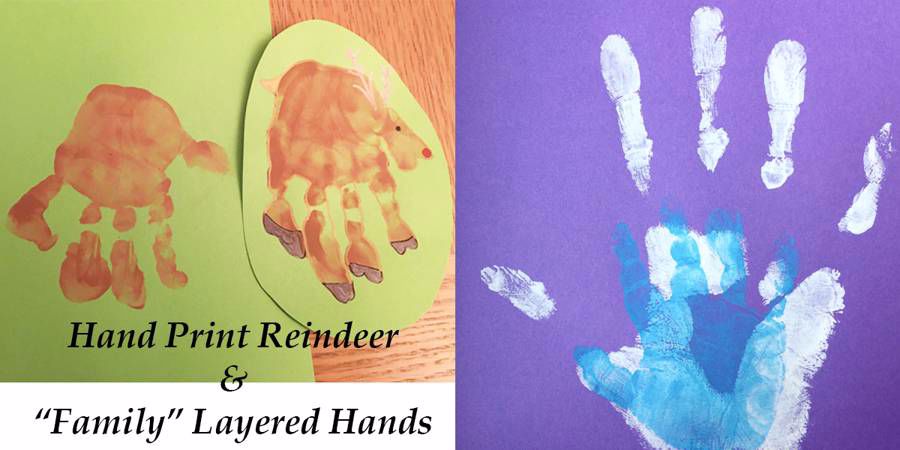
Card Crafts - Hand Prints
Robin, Reindeer or Santa work best!
Similar to the one above it's easy enough to make a print with your little ones hand, you can choose whether or not to paint the fingers in order to create certain designs, paint just two fingers to create the antlers on a Reindeer, or turn the print the other way for Santa - the thumb is his hat! The Robin can be sitting on a branch! Be creative because the possibilities are endless, and remember you can add finishing touches with paints, pens and 3D things like Sequins. Got a Red Nose Pom-Pom to make Rudolph?
You could always just do your family as handprints too! Layer them up for a nice effect. Do the largest one first, let it dry for an hour or two and then do the next print, and so on. Always try and put the base of the palms on the same line and the fingers all facing the same direction. Different coloured paints per hand work best.
Card Crafts with Paints
Finger Print Pictures are really fun to do with toddlers. You will need some plain card in any colour, child-friendly paints that are a contrasted colour to the card, and some box card to cut out some Christmas shapes. We did a Christmas Tree shape for ours, and then used our fingers to make a snowy scene. Keep your chosen shape on the card until you are finished with the paints and then peel it away to reveal the shape beneath.

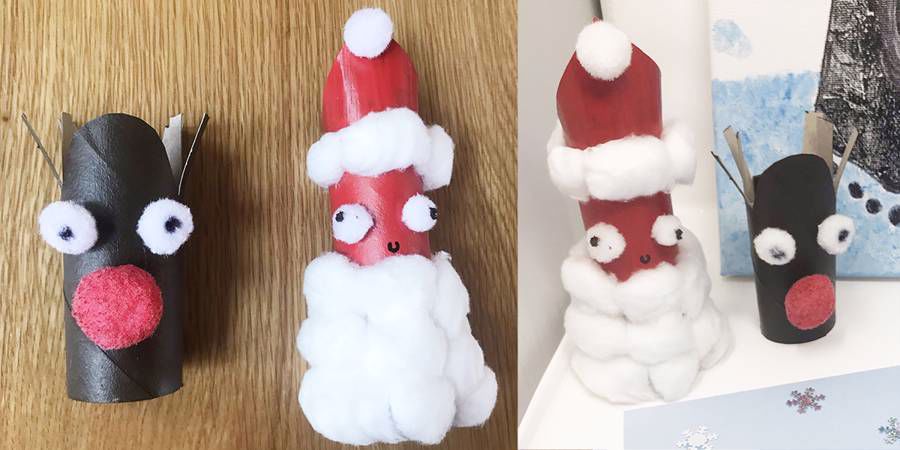
Toilet Roll Crafts
1 - Santa Claus
You will need some Cotton Wool, PVA Glue, a Brush, some Card from a cereal box (or similar) cut into a triangle with a point for his Hat, some Red Paint and either a Pen or some Googly Eyes.
- Paint your Toilet Roll and Card Hat Red and leave them to dry.
- Using PVA Glue stick the Cotton Wool around the middle and lower part of the tube to represent the beard.
- Attach the Hat using some glue and add a small amount of Cotton Wool to the top of the Hat and cover the top of the toilet roll to look like the rim of Santa's hat too. This will also disguise any of the lines.
- Finish it with Eyes and leave it to dry before displaying it. You could even glue a piece of string inside and hang it up!
2 - Rudolph the Reindeer
Take a Toilet Roll and paint it brown (or leave it the light brown neutral colour if you have no paint) and then leave it to dry. Once dried you can then cut down each side of the roll, try and match each side by making five cuts the same width so that you can separate these strips into the antlers. You should have three antlers from the five cuts (make sure little ones don't do the cutting part). Check out my images below for a rough idea on what it should look like.
To decorate your Rudolph you can either use a Pom-Pom for the nose, or a felt circle, a Sequin! Anything as long as it's red! If you want your Reindeer to look 3D then you need to have something that sticks out from the roll. Googly eyes are also a great idea, but you can use anything you have laying around.
Three Dimensional Crafts
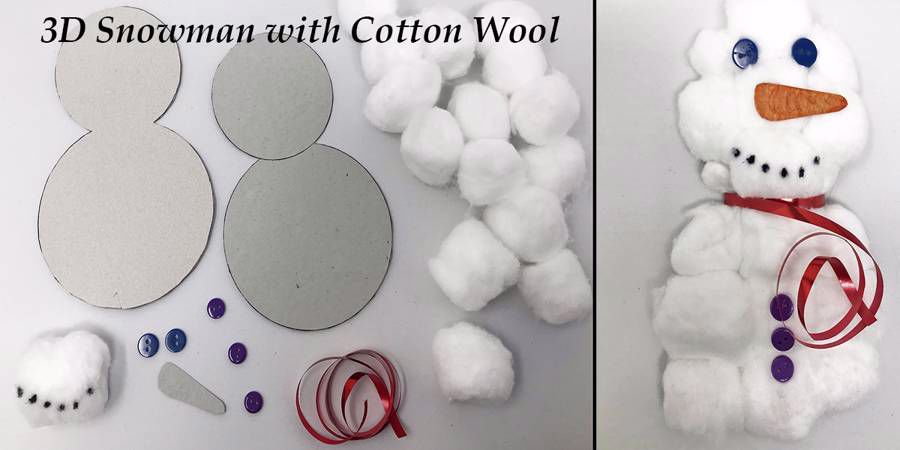
1 - The Cotton Wool Snowman
You will need some card to start this one off, I used a cereal box. Draw around two circular items, overlap them a little bit at the top end and make sure that one is slightly smaller than the other. This is to get your snowman shape of a large body and a head. You could do three lots of circles if you're feeling adventurous and have plenty of cotton wool! You need to then cut this shape out. If the card is thin I would duplicate this shape on another piece of card, cut that out too and stick the two shapes together. It will give it more strength when you glue on the cotton wool.

Your questions answered live by senior midwife Louise Broadbridge. A workshop covering what to expect in the early days, coping with morning sickness and planning for your first antenatal appointment.
You will need a decent handful of cotton wool, and other things to decorate such as buttons and googly eyes. If you don't have any of these then you can use other things, even a pen to create the features. I used some shiny Wrapping Ribbon to make my scarf but if you have some thread laying around you can plait it into a scarf for your snowman. I also made a cardboard nose and coloured it orange to represent a carrot.
2 - Pine Cone Christmas Tree
Have you collected any Pine Cones this year that have already dried out? Well then they are perfect for making a 3D Christmas Tree! You will need some Pom-Poms or something round for the baubles and a star or something similar for the top. PVA Glue is perfect for this because it will dry clear. I only had small Pine Cones, but the bigger the better! If they aren't flat you will need to glue the cone on to a cardboard base, I painted my base green first and my cone silver, before I stuck on some pom-poms and sequins.
3 - Card Bauble Decoration
This one is so simple but effective, using bent circles to make it look 3D. Decorate them before you stick them together and remember to also stick a piece of string through the top so as to hang it up.
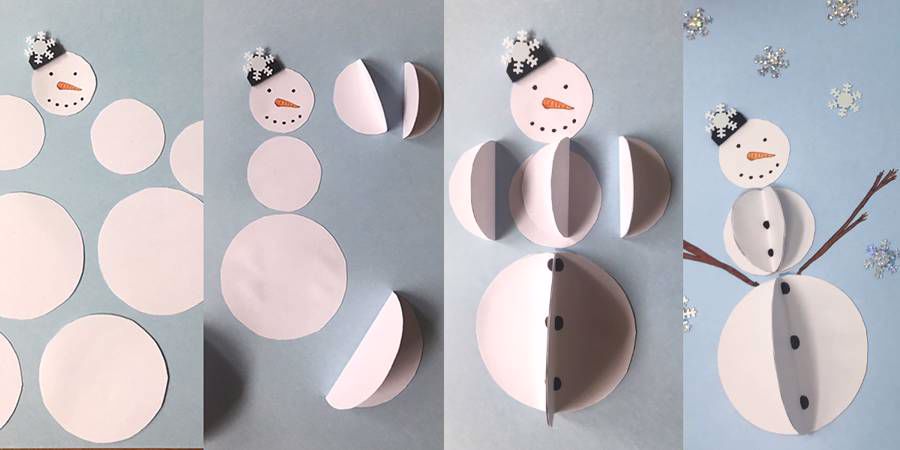
4 - Circle Snowman Card
Similar to the Bauble one, you use semi-circles to incorporate the 3D aspect of the Snowman. You need two different sized sets of circles in white, 4 one size and 4 the other. Use a pen to make decorations and then some card to make your snowman a hat. This is nice as a homemade Christmas card to give to a loved one. Add some snowflakes like me to add some sparkle!
5 - Tissue Paper Christmas Tree
If you have some green tissue paper and some sequins or pom-poms, then it is simple to make a 3D tissue tree. Take a pen and a piece of card, draw a Tree shape and cut it out. You will need PVA Glue to attach the tissue paper on to card. If you want it to stand up once it's finished you can cut a slit across a toilet roll and use that as a base.

Relax and prepare for labour from the comfort of home, suitable for all levels. Includes breathing techniques to assist in labour & postures to release tension.
6 - Ice Lolly Stick Snowflakes
Use paint and glue and whatever you've got as decoration on your sticks, before glueing them together across their centres one on top of the other in the shape of a star or snowflake. Hang a piece of string from it or ribbon so you can hang it from your Christmas tree.
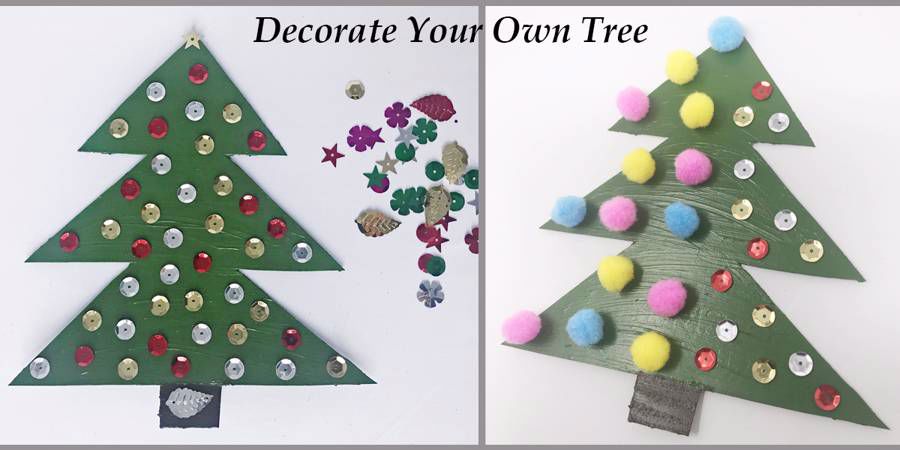
7 - Decorate your own Tree
Make a Cardboard Tree, by cutting out a shape from some card, and then paint it green. Once left to dry overnight your children can then decorate their tree with whatever they like. Sequins, Pom-Poms, anything 3D works well. To match them up for more than one child, draw around your first shape on to another piece of card. You can use anything you like to decorate, you just need some PVA Glue. Remember to supervise little ones with things like Pom-Poms so they don't get ingested. To stand your tree up afterwards, cut a slit in a quarter of a toilet roll, and stand the base of the tree inside this slit. The toilet roll looks like a pot, you can decorate this too!

Christmas Canvas
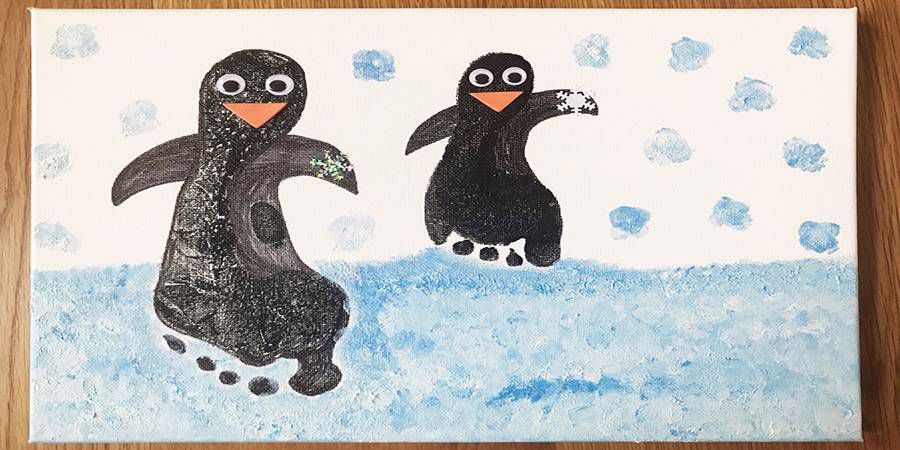
If you are a seasoned art and craft fan then you might already have a small blank canvas laying around at home. If you do then you could make a Christmas Canvas! You can either use your family Hand Prints or Foot Prints. Layer them up, do them Side by Side, it's totally up to you. I have done us both as penguins playing in the snow. I also did our Hand Prints layered up on a piece of card too.
I'm really happy with the end result! Would you love to make a family Christmas canvas? You can be any animal you like, it can be handprints and not feet if you prefer! TOP TIP Always size up if your prints will all fit on the same canvas before you begin.
Thank you so much for checking out this article today. If my crafty creations have inspired you then please let us know and tag us on social media to show us all what you get up to over the festive weeks. Merry Christmas from me, Sabrina!